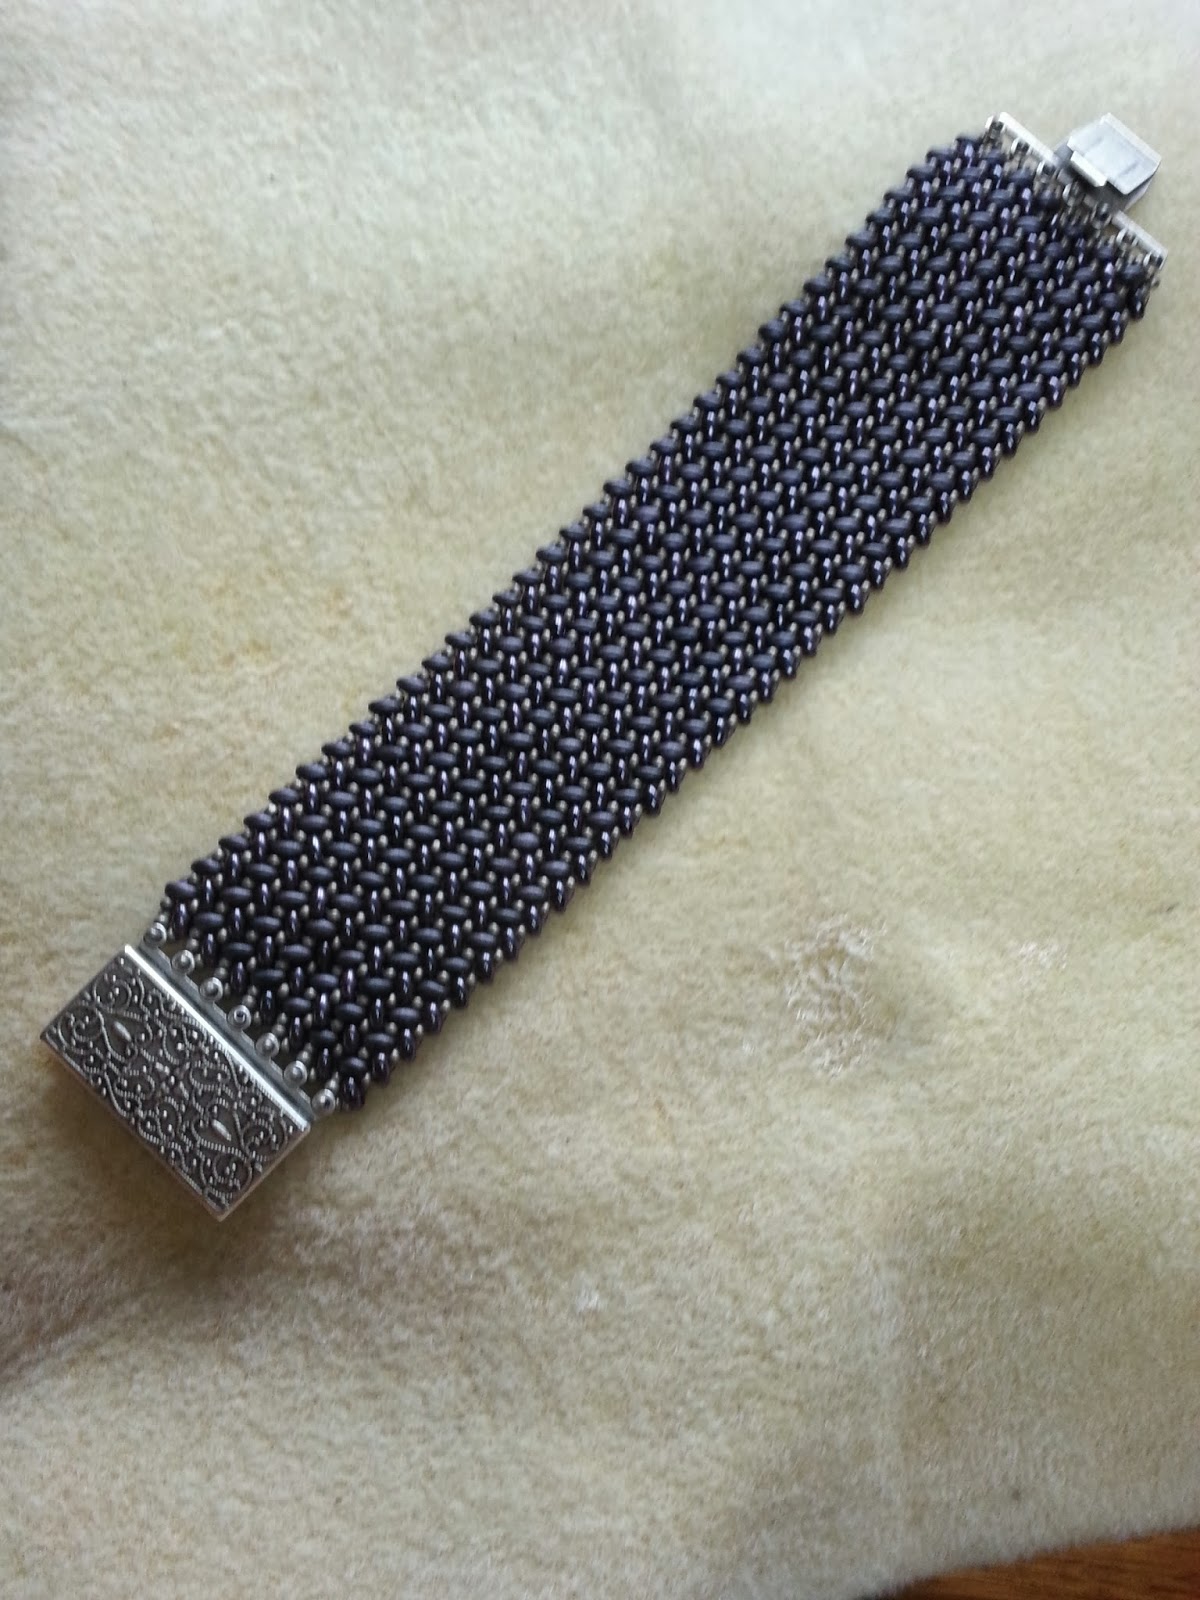
I like the new two-hole beads which have been coming out over the past year or so. Any excuse to try something different!
Herringbone is one of my favourite stitches, and I found a pattern for a mixed twin bead/seed bead herringbone on Patty Perline's blog here: http://pattyperline.blogspot.it/2013/06/superduo-herringbone-texture.html
Once you get past the first couple of rows, it's a very easy pattern to work with. My only suggestion would be to pick up two seed beads in the first row (ie one two-hole, two seed beads ...), but only stitch through the second of the seed beads in the next row. Without doing that, you get very loose tension in the first row, or a lot of thread showing. The second seed bead takes up the slack and the start row looks much better. When you get to the other end, do the same thing in reverse.
Here the bracelet I made using this technique. I have used alternating shiny and matte metallic purple two hole beads, with silvery-grey seed beads. The alternating matte and shiny produces a really interesting effect and gives an extra texture to the weave. This beadwork is very supple, almost as soft as fabric, and very comfortable to wear. I would possibly make it one or two rows shorter if I had a do-over, but that's a minor quibble. One more UFO finished!
Thank you Patty Perline!
Tuesday, September 24, 2013
Friday, August 30, 2013
It seems to be a while since I posted a blog entry. There's been too much going on with work! Also, I have been reluctant to post any of the pieces I have made for the Johnston Collection exhibition, as I want them to be 'unveiled' there. I am very happy with the way things are going though! I have been able to try out a few new tricks and see how they look.
This piece is one I made about four years ago. I bought the two cabs at the Bead and Button Show from Earthenwood studio [http://www.earthenwoodstudio.com/]. I also bought all of the seed beads at the Show - they were all colours that were unobtainable in Australia at the time, so I was very keen to use them. The cabochon is edged with a double 'ruffle' of picots which include magatamas - my own invention and I still think it looks great. Magatamas are under-rated in my view, they should be used more.
The main thing I initially learnt from making this piece was the variations that can be achieved with herringbone stitch. I used alternating magatamas and size 11o seed beads - a trick I picked up from Laura McCabe [http://www.justletmebead.com/] at the Show. The technique gives you a fantastically textured rope. Also the edging - you can achieve lots of different effects depending on the beads you use.
I subsequently learnt a lot about coated beads and why you shouldn't use them with a bailed pendant! The finish has actually been rubbed off many of the beads in the rope around where the bail generally sits - the friction between the two sets of beads has done this. Some of the beads in the bail have lost their coating too. I was still fairly new to specialty coatings at that stage, and really had no idea that this would happen. If I had a do-over, I would still use the same beads, but I would fix the bail in position, or design the necklace without a bail, so that there was no risk of rubbing. In fact the last few projects I have done, I have done exactly that.
A friend loaned me some rub-on gold embellishing paint, which I tried out, and it has covered the beads which lost their coating, so they aren't so obvious. It will be interesting to see how long the paint lasts. I expect that in the end, I will have to pull the rope apart and re-do it, which is a pain, but I have always liked the necklace so I'd like to salvage it if I can.
So there's the lesson from this piece - don't use beads with fragile coatings in locations where they will suffer a lot of rubbing. The manufacturers aren't joking when they say that the coatings will come off!
This piece is one I made about four years ago. I bought the two cabs at the Bead and Button Show from Earthenwood studio [http://www.earthenwoodstudio.com/]. I also bought all of the seed beads at the Show - they were all colours that were unobtainable in Australia at the time, so I was very keen to use them. The cabochon is edged with a double 'ruffle' of picots which include magatamas - my own invention and I still think it looks great. Magatamas are under-rated in my view, they should be used more.
The main thing I initially learnt from making this piece was the variations that can be achieved with herringbone stitch. I used alternating magatamas and size 11o seed beads - a trick I picked up from Laura McCabe [http://www.justletmebead.com/] at the Show. The technique gives you a fantastically textured rope. Also the edging - you can achieve lots of different effects depending on the beads you use.
I subsequently learnt a lot about coated beads and why you shouldn't use them with a bailed pendant! The finish has actually been rubbed off many of the beads in the rope around where the bail generally sits - the friction between the two sets of beads has done this. Some of the beads in the bail have lost their coating too. I was still fairly new to specialty coatings at that stage, and really had no idea that this would happen. If I had a do-over, I would still use the same beads, but I would fix the bail in position, or design the necklace without a bail, so that there was no risk of rubbing. In fact the last few projects I have done, I have done exactly that.
A friend loaned me some rub-on gold embellishing paint, which I tried out, and it has covered the beads which lost their coating, so they aren't so obvious. It will be interesting to see how long the paint lasts. I expect that in the end, I will have to pull the rope apart and re-do it, which is a pain, but I have always liked the necklace so I'd like to salvage it if I can.
So there's the lesson from this piece - don't use beads with fragile coatings in locations where they will suffer a lot of rubbing. The manufacturers aren't joking when they say that the coatings will come off!
Friday, March 22, 2013
Tubular beadwork tutorial (Chenille Stitch): a simple idea for a tubular...
I have tried the plain chenille stitch and really like it - this multi-colour version is interesting too.
The video is by Sara Spoltore.
http://www.youtube.com/watch?v=q7T5RSYp3q8
The video is by Sara Spoltore.
http://www.youtube.com/watch?v=q7T5RSYp3q8
Wednesday, March 20, 2013
The Johnston Collection - update - the first lot of kits have gone out
It's amazing how complicated it actually is to manage a project of this size. Planning and making enough Christmas ornaments to cover a Christmas tree, plus sundry other items, is actually a lot of work!
We have planned a series of projects as follows:
- 3d Peyote stitch ornaments (range from beginner to advanced)
- Netted baubles (some easy, some difficult)
- Snowflakes and stars (all mostly easy)
- Bead-embroidered ornaments using cabochons based on miniatures in the Collection.
Peyote Stitch Ornaments
I purchased several patterns for these ornaments. The next step was to spreadsheet out how many beads would be needed for each kit. My aim has been for each ornament to be at least slightly different to any others made with the same pattern, so that each person has their own unique ornament. Actually working out colour-ways for the ornaments was surprisingly difficult, even though I had a limited colour range to work with. I sincerely hope everyone is happy with the results! The quantities had to be worked out down the number of grams for each seed bead colour and the number of crystals etc that were required. The beads were then ordered in by Cranberry Beads [http://www.cranberry.net.au/] for us. Jo spent a lot of time sourcing the beads at the best prices for us and I am exceedingly grateful, we couldn't have done this without her help.
The first set of about twelve kits of these has gone out. Thanks to a major sale on delica beads at Spotlight, I have enough beads to kit up several more of these ornaments, which I will do soon.
These pictures show the colours we are using for the ornaments: matte black, matte off-white (light cream?), rich red and dark gold. We would have liked to use a brighter gold, but matte gold beads cost a fortune! So I chose a darker gold, actually bronze, matte metallic, which is very striking, especially against the cream beads.
Netted/stitched baubles
I sometimes wonder why I refuse to take the easy route if I can find the more complicated way to do things! Yes we have patterns for easy netted baubles, but no, I didn't want to do those, I wanted to do some quite complicated patterns! Naturally, we couldn't find baubles of the right size to match the patterns (why don't they sell the same size baubles in Australia as in the USA?). Fortunately, we have a clever BSV member who is testing the bauble patterns and re-writing them to suit the size of the baubles we have. Once she has completed that, we will kit up all the beads that were set aside for baubles and then hand them out to members to make up the baubles.
Bead Embroidered Ornaments
I have just gotten started on these and have found that I am rotten at making cabochons. I will need to seek some help before going further with that, from someone who knows how to do it. I also want to go back to the museum and have another look at some of the Collection items to see if I can find anything I can use to inspire the bead embroidery around the cabochons.
We had a group meeting with all of the other arts and craft groups participating in this project yesterday at Baxter Hall. I was blown away by the creativity on display and the amount of work people have done on their contributions. I feel like so far most of what we've done has been counting, but now that we have embarked on the actual beading I'm sure progress will be made. This has been such an interesting project to work on and I have learnt a lot already about how to plan a group project and how to manage the set up for it - mostly of course by doing it badly and learning from my mistakes, but what's new there?
Here's a photo of the first order of seed beads for the peyote stitch ornaments:
And here's the first lot of bead kits, ready to go out to members:
I am really looking forward to seeing the completed ornaments and hearing what people think of them!
Thursday, January 31, 2013
How to Attach Embellishments to a Focal Piece
This is an interesting idea for embellishing a cabochon. Presumably it would work with lots of different types of 'shapes'. Must try something like this!
An idea for using Preciosa Twin Beads
Here is an idea for using Preciosa Ornela twin seed beads. I haven't seen them used for bezelling before, but I suppose it makes sense that you could create rounded forms by varying the size of the seed beads in between the twin beads. I'm wondering now if you could do the same thing with a flat cabochon? Might be fun to experiment!
Wednesday, December 5, 2012
A new project for 2013
The Johnston Collection is a house museum in East Melbourne, which has a wonderful collection of Georgian and Victorian antiques [http://www.johnstoncollection.org]. The House and contents originally belonged to Mr William Johnston, who left his collection to the people of Victoria.
One of the interesting things about this Museum is that they completely redecorate the house every few months, moving things around and bringing some items out for display and retiring others. This means that the display is regularly refreshed, unlike other house museums where the same things may be on display for years.
At Christmas every year, the curators work with the craft guilds of a region of Victoria to decorate the house. Each guild (or an individual artist or group of artists) has responsibility for one room in the house. The members make items inspired by items in the collection, the life of Mr Johnston or the story of Christmas. It's a great concept, as it encourages each guild to work collectively on a project, but it also encourages the guilds to work collaboratively. I've heard that in the past it has been a real network building exercise.
Next year, 2013, is the turn of the Mornington Peninsula craft guilds. And, even though there's only about five or six Bead Society of Victoria members living on the Peninsula, we have been invited to participate. I was extremely hesitant at first, because I thought we would have to festoon an entire room in beads and I couldn't picture what we would have to do and didn't want to have to do all that work! However, after going to a couple of their presentations, and seeing the museum, we have developed a strong concept and I feel confident that we can achieve it, even if I end up spending hours making netted baubles!
We will be decorating the White Room in the museum, and will have a Christmas tree (hence the baubles). We will also make various small items such as snowflakes to hang from the sconces and beaded snuff boxes to display on the mantlepiece. Our colour scheme is inspired by the Collection - dark red, dark gold, cream and black.
I've just finished the first part of the job - sourcing the patterns, choosing bead colours and working out the first order of beads, which took ages. The next job is to recruit helpers (we are allowed to recruit people from outside the Peninsula to help, as long as it is led by us). We have selected a variety of patterns ranging from very complex down to quite simple, and hope that other BSV members will help.
I plan to keep a record of how it all goes on my blog this year.
Here's some of the beads I have compiled so far for the project - don't you love that gorgeous rich red?
One of the interesting things about this Museum is that they completely redecorate the house every few months, moving things around and bringing some items out for display and retiring others. This means that the display is regularly refreshed, unlike other house museums where the same things may be on display for years.
At Christmas every year, the curators work with the craft guilds of a region of Victoria to decorate the house. Each guild (or an individual artist or group of artists) has responsibility for one room in the house. The members make items inspired by items in the collection, the life of Mr Johnston or the story of Christmas. It's a great concept, as it encourages each guild to work collectively on a project, but it also encourages the guilds to work collaboratively. I've heard that in the past it has been a real network building exercise.
Next year, 2013, is the turn of the Mornington Peninsula craft guilds. And, even though there's only about five or six Bead Society of Victoria members living on the Peninsula, we have been invited to participate. I was extremely hesitant at first, because I thought we would have to festoon an entire room in beads and I couldn't picture what we would have to do and didn't want to have to do all that work! However, after going to a couple of their presentations, and seeing the museum, we have developed a strong concept and I feel confident that we can achieve it, even if I end up spending hours making netted baubles!
We will be decorating the White Room in the museum, and will have a Christmas tree (hence the baubles). We will also make various small items such as snowflakes to hang from the sconces and beaded snuff boxes to display on the mantlepiece. Our colour scheme is inspired by the Collection - dark red, dark gold, cream and black.I've just finished the first part of the job - sourcing the patterns, choosing bead colours and working out the first order of beads, which took ages. The next job is to recruit helpers (we are allowed to recruit people from outside the Peninsula to help, as long as it is led by us). We have selected a variety of patterns ranging from very complex down to quite simple, and hope that other BSV members will help.
I plan to keep a record of how it all goes on my blog this year.
Here's some of the beads I have compiled so far for the project - don't you love that gorgeous rich red?
Subscribe to:
Posts (Atom)