Wednesday, December 22, 2010

The perils of blocked creativity

It's been ages since I last posted here, for two reasons:
  • I've been totally blocked on the main piece I was working on - the Steampunk design - and can't figure out how to finish it.  It's driving me nuts!
  • I set aside my main beading for a while to work on my entry for the Bead Society of Victoria's 2010 Bead Challenge.  Of course, I couldn't post pictures of that on my blog, because it's a competition!  The rotten thing is that I because totally blocked on that one as well.  After several attempts at redesign and re-works, in the end I didn't get it finished in time to enter into the competition.  I'm pretty sure I can re-work was was going to be the central medallion into a hair clip though, so at least it won't be a total loss.  That's now four times I've purchased the beads, and only once I've actually completed an entry. 
All is not completely lost!  I finally finished a piece this morning that I started in a class with Marcia De Costger back in mid-November.  It's called Romantica, and I'm very happy with the way it turned out.  I stuffed up a couple of times and had to pull apart the chain a couple of times and re-do it, which was annoying, but I got there in the end.

I've decided that this next year is going to be my UFO year.  I need to finish off some of the projects that are sitting around my house.  Some are half done, some haven't even begun, they are just boxes filled with beads and ideas.  So I'm not going to start anything new until I have some of these older pieces completed.

Tuesday, July 6, 2010

Gothic-style beadwork

Check out these fabulous gothic-style beadwork pieces!
http://home.kpn.nl/indianen/gothiccontest.html

Monday, May 31, 2010

Coffee and Honey


I went a bit crazy and bought a whole pile of fire-polished crystals recently, from Over the Rainbow, who were having a sale over May [www.polymerclay.com.au].  I wanted to do a couple more of the diamond net ropes (I now have enough crystals to do more than a couple!).  These 'latte' crystals went very nicely with the seed beads.  I matched them with biege size 15/o seed beads and galvanised gold size 11/o seed beads in the rope.  They work really well together.  The clasp is an antique glass button with a simple loop at the other end.
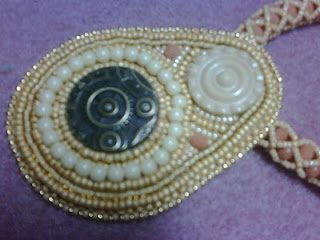
The pendant had to be designed to go with the rope!  I used an antique glass button and a new steampunk style metal button as the focals, and then did some bead embroidery around them.  I rather like the way this one turned out.  Instead of doing a loop at the top of the pendant for a bail, I did the loop going down the back of the pendant, so that it hangs slightly up over the rope.  I wish I had figured that one out earlier, I would have used it on another couple of earlier projects.  I really like the galvanised-finish  beads.  I have some in gold and silver and they are both nice.  The matte metallic finish is interesting mixed in with other bead finishes.  It's nice to be able to use some of the beads and so on in the stash too.  I doubt very much whether I could claim this one as Steampunk - it's the wrong colours for the Victorian era, which Steampunk is based on.  Still, the 'industrial' button works nicely with the other elements in the pendant.

I went to the Melbourne Bead and Gem Show on the weekend with some friends [www.beadandgemshow.com.au].  As usual we had fun rummaging through all the beads and buying stuff.  I was relatively restrained this year, at least partly because the ATM wouldn't give me any money first thing in the morning!  I purchased some velvet display busts from Feeling Inspired, including one large one to use when working.  I'm finding that things will actually sit on it - these ones already have an artificial suede backing glued on, which is probably why they stick to the velvet, I doubt if it will work all the time.  Even so, there is enough padding under the fabric that it will be easy to pin things to it to hold them in place.  It should prove useful in designing pieces where I need to plan how things will drape.  As you can see, my real Steampunk project is progressing slowly.  I got some supplies for it at the Show, so will move ahead with it now.

Thursday, May 13, 2010

A beaded keyring

Yet another class project with Noelle Walker.  I rather fancy this little keyring - you can twist off the lid and hide needles, pills or some money inside.  the beading is peyote stitch in a basketweave pattern using delica cylinder beads.  Noelle's web-site is http://www.silkstonedesign.com/.

Now I'm back to my steampunk piece, which is coming together nicely. 

Monday, May 3, 2010

The domino effect

I do a beading class at Craftee Cottage in Oakleigh once a month with Noelle Walker, which I really enjoy.  I've been going for three or four years now.  Every nonth we do something different, and it has given me a fantastic grounding in beading techniques.
The necklace to the left is made in a netting technique called filled tubular netting, which Noelle taught in the class last month.  It's a netting tube with crystals woven into it, so that each 'diamond' of netting is filled with a crystal.  It's a very effective technique.  I've seen several variations made by beaders at BSV meetings and it's one of those patterns that can look completely different depending on the beads used.
My version has been made with mauve fire polished crystals (some of the stash from America) and teal 15o and 11o seed beads.  The focal is actually an old domino which was painted by Sharlene of Paper Surprise.  I purchased it at the Bead Expo from Kay's Artycles.  I have used the standard cabochon technique - it's glued to stiffened felt and then I have used peyote stitch to form a bezel around the domino.  I felt that it didn't look quite right with plain sides so I added an embellishment, which is echoed in the embellishment around the outer edge.  I have used some amethyst coloured crystal beads at each end of the netting tubes, and the clasp is a vintage brass button and a loop.

I suspect this may have turned out to be too mauve - I really like the look but feel it is a bit too old for me.  I need to think about it for a while I guess.

Anyway, now that I have cleared away these smaller projects, I have moved on to my first attempt at Steampunk jewellery.  I've been collecting bits and pieces for a while now, and am finally ready to have a go.  The picture shows the beginning of the central pendant, which has a watch face and wings - there will be more added underneath.  I think I will name it 'Procrastination', both because I delayed starting it for ages and because I seem to waste so much time through procrastination sometimes - hours just fly by!  It's going to be interesting to see how this turns out - I have an image in my head but I'm not certain how it's going to translate.  After that it will be time to move on to my Bead Challenge entry at last ...

Monday, April 26, 2010

Amazingly enough, I have finished something!

Here's my finished bead lace necklace with the spotty daggers.  I made a loop and toggle closure with a vintage triangular button, which works quite well.
The bead lace pattern was designed to automatically curve, so it naturally makes a circle like this.  This means that it sits flat on the neckline without any kinks.  It looks great on! 
Next step - cleaning up some of the detritus around my beading area so I can get some room to work on one of the other backed up projects - there's about five or six waiting to be done at the moment.  Sometimes I seriously wonder if I have ADD!  I rarely seem to stick at one project until it's finished, and I have lost count of the UFOs.

Monday, April 12, 2010

Fibres Ballarat 2010

I've just spent a week at Fibres Ballarat 2010 [http://www.mannmaid.com.au], doing a class with the Bead Cats, Virginia Blakelock and Carol Perrenoud.  It was a lot of fun and very instructive.  Unlike many beading classes, where you have a set project to make, this was quite freeform.  V&C had samples of various projects we could try if we wanted, or we could work on our own projects with help from them, or make samples of various stitches.  It was a good opportunity to try out different stitches and see what I liked and didn't like.  I also set myself the challenge of using bead colours I wouldn't normally use, to stretch things a bit further.  I hadn't been to a Fibre Forum event before, and it was really interesting to participate in one.  I particularly enjoyed the nightly slide shows by the various teachers, talking about their work and inspirations and why they make what they make.

My samples at the end of the class look a bit like botanical specimens pinned to a board!  They include several flower and leaf shapes, which will eventually be combined into a hair clip, and a length of two-needle right angle weave beading, which will eventually bcome a bracelet.  it's always interesting to see how the same pattern looks completely different depending on the colour and finish of the beads used.  It doesn't look like I did much, but the class wasn't just about sitting doing beading - there were discussions about colour theory, how to get different effects from different finishes, and various other things.  Virginia and Carol also gave us an in-depth talk on how they had made several of their major beaded artworks, and some of the technical issues associated with that.  I'm really quite keen to try doing a beaded collar, so hearing a bit from Virginia about the tricks in constructing them was quite useful.
I also loved the trading hall area, which had several people selling everything from class supplies to books.  I went mad amongst the vintage buttons and the table covered in fabric samples.  I also bought some nacky threads.  This is on top of all the beads I bought from the Bead Cats!  The week ended with a exhibition of all the students work, and it was great to see what everyone else had been doing.  I'm hoping some of the other teachers come back in future years, so I can do classes with them, especially the Kumihimo teacher and Mary Hettmansperger.

Sunday, March 21, 2010

Last weekend at the BSV meeting Jo (www.cranberry.net.au) had some gorgeous multi-coloured dagger beads with polka dots on them. They are in various metallic shades, mostly lilac and apricot. Jo laughed when she saw me eying them off, and asked if she should take them away! If only I had looked at them and not had a shred of inspiration, I would have been fine, but of course as soon as I saw them an idea popped in my head!
I have a book called Crystal Lace Necklace Patterns by Sandra Halpenny, which I made a 'gothic' style necklace from for a Christmas gift. I knew that the daggers would work with one of those crystal patterns, so of course I ended up buying some.

Here's the beginnings of a necklace made with the daggers. The bead lace pattern is quite complicated - learning right-angle weave will be a doddle after doing some of these patterns! It doesn't help that there was a mistake in the book in one place - I only figured it out with the help of a magnifying glass and the photo. I should havbe been patient and waited until I could get some appropriate coloured crystals to use as the highlight beads, although the frosted lilac 8os look quite good - understated I guess.

Having a rush of enthusiasm for the bead lace meant that I had to put away the other project I had just started. Here's a photo of the layout.

I bought these beads at Spacetrader. I was told they are replicas of antique beads made in Africa. They are certainly interesting shapes and sizes. My plan is to create a collar using peyote stitch to collar the beads and herringbone connectors.
As soon as I have finished the bead lace, I'll get back to this one. I might then, at last, get to the blue bling one. Funny how all my current projects are so different! I need to get started on my Bead Challenge entry soon too ...

Thursday, March 4, 2010

The butterfly is done!

I finished the butterfly hair clip last night. Here are some photos taken while making it.

One thing I learned from making this was to not stitch the 'veins' in before starting the main stitching. I thought having the outline done first would make it easier to keep both sides even, but that wasn't the case.

Next time I will simply draw the pattern I want on to the felt before I start stitching, and use that to keep things even.
I will try to be more adventurous with colour on the next one! I like the colour of these beads but I feel this one is a wee bit bland. I think I will make a yellow one next time ... my beading buddies always laugh when I threaten to make something in yellow so maybe I need to actually carry it out. Before I do another hair clip though, I'm ready to get started on the next big bling project. Updates will follow.


Monday, February 22, 2010

What I'm working on right now

I'm currently making another hair clip, this time a butterfly. I have used a clip art image for the template, transferring it onto stiffened felt with carbon paper. There's challenges in getting the bead placement right even in a straight bead embroidery piece like this!


This one is my current big bling project. At the moment I'm still thinking about how it will work and what components to use. You can see in the photo I have heaps of beads ready to go. I'm just about ready to jump in and get going once I've finished the butterfly.

A Tale of Three Cabochons

I have made or finished three cabochon projects since Christmas, and have had an interesting experience with each of them.

The one on the left is actually half a geode, so it's not technically a cabochon, but let's not quibble :) I bought this geode from Gary Wilson at the Bead and Button Show in 2008, after seeing Laura McCabe wearing a fabulous necklace that she had made out of one. It sat in the drawer for ages, then I decided to try and do something with it. It's since been one of those projects that I pull out and put away again on a regular basis, never happy with what I'm trying. I've gotten to a point where I'm happy with how I've captured the geode, using a combination of peyote stitching and free-form netting. My difficulty is in the embellishment. I've tried several different fringe ideas and various other things, but haven't been happy with any of it. It's wearable as it is now, although very plain, so I'll probably just leave it now. I have another geode in the drawer, so maybe I'll try something more elaborate with that one. It's in projects like this that I really feel my lack of confidence in free-form embellishment - other people would just go for it and turn out something fabulous, but I have trouble visualising what the end result will be. So I have learnt from this project that I need to build confidence in going outside the boundaries.

The cabochon on the right was bought from a BSV member at the 2010 Bead Retreat [beadsociety.com.au]. It's a pretty teardrop shape piece of stone in an interesting shade of purple, with green and gold inclusions - really attractive. Sadly I've botched this one. It currently looks like it would belong on a Bollywood set, but definitely not around my neck! I've decided that the edging is in the wrong beads, and is slightly too much for this stone. I actually really like the way the edging came out - it was one of the technique's in Jamie Cloud Eakin's book Beading with Cabochons, which is one of my favourite beading books. I just used the wrong beads and the edging is too wide for the size of the cabochon. I'll have to unpick this one and start again unfortunately.

I'm actually really happy with the way the middle project came out. Funnily enough, this evolved quite by accident. I decided to join a couple of my fellow BSV committee members in going to the first BSV meeting in Geelong earlier this month. I was told that they were going to be learning spiral rope technique, which I know really well, so I rummaged through the stash and found some beads that I though would go nicely together in a spiral rope. Anyway, I started the rope at the meeting, and really liked the effect. It has copper coloured delicas as the core bead, then two shades of green 15s and a green lined crystal triangle in the outer beads. The triangles seem to lock together really well, making a tight and effective spiral that shows off the copper core very well, so I must remember that for future spirals. Anyway, I had only planned to do a small piece as a sample, but by the end of the meeting I had a length of spiral rope about 15 cms long - too long to unpick! So I decided I had better finish it and then find something to hang off it. I had a rummage around the stash again, and came up with this cabochon, which is another one of the cabs I purchased from Gary Wilson. I had actually completely forgotten about this particular cab, but it goes perfectly with the colours in the spiral rope. I also had several other different types of copper beads, so had some fun with embellishing the cabochon. I particularly like how the outer edge turned out. I sewed down the copper lined crystals first, then ran through them, picking up some 15s and a triangle each time. The bail has been made using herringbone stacks, but I figured out a minor variation on adding embellishment beads in between, which looks very effective.
I suppose being happy with one out of three projects isn't too bad really, and at least I know what's gone wrong with the others. When I get around to re-jigging the Bollywood one I'll post the before and after pictures.

Tuesday, February 16, 2010

The big bling project

This is the big bling necklace I mentioned in an earlier post - my first major project finished this year. This was the most complicated piece of jewellery I have designed and executed from scratch, particularly in terms of construction. It's not obvious from the photo but the necklace has been shaped to ensure that if fits nicely around the neckline and that all of the components and strands sit flat.


The materials in this necklace include:

  • three 27mm Swarovski rivolis (all 'purple haze')
  • two 18 mm rivolis
  • two 14 mm rivolis
  • one triangular crystal
  • small Czech dagger beads
  • copper delicas
  • various seed beads in shades of copper and purple (garnet/amethyst)
  • droplet beads, mostly in amethyst
  • 2mm garnet round beads that I bought in Bali a few years ago
  • Czech faceted rondelles
  • Copper Size 8o beads and copper size 15o charlottes.

I started by making all of the components and then figuring out how to put them together. I was actually inspired by a Miriam Haskell necklace in the book 'Fabulous Fakes' by Carol Tanenbaum [http://www.amazon.com/Fabulous-Fakes-Passion-Carole-Tanenbaum/dp/1579652921/ref=sr_1_1?ie=UTF8&s=books&qid=1266279989&sr=8-1], which I had borrowed from a friend. My necklace doesn't look much like the one in the book, which was made with pearls, but it gave me the idea to use the rondelles to connect the components.

What did I learn from this project?
  1. I had some fun embellishing the rivolis and learnt a lot about what you can and can't do. I will use a different method for connecting dagger beads next time, because I only used one thread and the beads move so much I've already had to mend it a couple of times.
  2. If you're connecting pieces it's a good idea to determine connection points and actually add the connector elements while you're doing the initial bezelling and embellishment. If you don't, you run the risk of trying to do too many thread passes through the beads and breaking them. On these components I ended up adding loops at the back and using the loops to secure the connecting strings of beads, rather than connecting them directly to the rivoli bezel.
  3. I learnt a lot about shaping a necklace and how each section needs to be different in order to achieve the shape. There are three strands of beads between the front components and the clasp, and each one had to be a different length to get them to sit flat. Even the strings between the components at the front of the necklace had to be different lengths. It was usually only one or two beads each way, but it took a long time to figure out the correct number of beads for each section!

  4. I have an unfortunate love of Swarovski crystal, particularly the larger rivolis. I say unfortunate because I love looking at them but not wearing them (except for very rare evenings out), so why I make things with them I really don't know!

I'm very happy with the way this one turned out, even though it's so over the top I may never be game to wear it. I've been toying with the idea of submitting it to the Bead Dreams Competition this year. We'll see ...

Beaded Hair Clip

I just finished this hair clip last night, and am already wearing it. I've tried doing hair clips a couple of times in the past, but the main sticking point has always been that I hated the cheap and nasty barrette clips which were all that was available. Anyway, I finally tracked down a source of the better quality french barrette clips in Australia [http://www.polymerclay.com.au/], and bought several of them to try out some hair clip ideas.
This clip was made using a large Czech glass button I purchased from Cranberry some time ago [http://www.cranberry.net.au/store/index.php]. I always though it was too big for a necklace focal but liked it so much I wanted to try to do something with it. The aim with this design was to create something that was wearable first! I was hoping for a slightly Art Deco look with the bead placement. I had some lovely aqua-coloured beads and crystals which went very well together in this piece, I'm really happy with the way it turned out.
So what did I learn from this project?
  1. Don't try to remove the shank from a glass button! This is actually the second button I bought from Cranberry - I broke the first one trying to remove the shank. If you look at the back of this piece you can see the shank sticking out in the middle of the barrette clip - it actually doesn't cause any problems.
  2. Be careful with bead choice and placement - in particular avoid heavy beads for a hair clip. You don't want to feel like the back of your head is weighed down by the clip.
  3. I had some trouble cutting the backing fabric to go around the barrette clip and will have to practice this more - it really doesn't look very good at the moment.
  4. I still need to practice getting things symmetrical. I need to learn to draw out the pattern first onto the base fabric before getting started. My mother always used to say I was like a bull at a gate and she's right - I so often jump in without really thinking things through, then have to figure it out later. It would be a good idea to draw the design and clip placement on to the base fabric before starting stitching, so that everything lines up properly.

I've also learnt that hair clips are a great way to do some beading without committing to months and months of work! This one only took a few nights to make. I'm inspired now to try a few more designs. I think the next one will be a butterfly - I've already printed out a pattern and the next thing is to choose some beads.

Saturday, January 30, 2010

Seed Bead Colours

Have you ever wanted to know the range of colours available in Seed Beads? It'a actually possible to download pdf copies of sample cards from some of the main bead manufacturers. You can use these in planning future projects.

For Toho Beads (including Treasures and Aiko), go here:
http://www.tohobeads.net/sample/sample.html

For Miyuki Beads, go here:
http://www.miyuki-beads.co.jp/english/seed/01.html

The Toho beads sample cards are only shown in html format. If you want to download a copy, it's probably easiest to print each page using a pdf convertor.

You can also obtain colour charts for Swarovski products. Go here:
http://crystallized.swarovski.com
and search for 'colour range'. You'll have to scroll through to find the relevant colour charts. It used to be much easier to find the relevant page but they seem to have re-designed their web-site.

Friday, January 22, 2010

Beading in 2010

Now that I have revisited 2009, what's in store for beading for the coming year?

My first finished project for 2010 was a major piece for me - I have to take some photos before I can do a post on that one.

I'm currently doing a kit project - Dragonclaw Necklace by Laura McCabe. I'm enjoying working to a pattern and having a break from trying to figure out the technicalities - more when I post about the piece just finished. I like the Dragonclaw project - the beads are fabulous and it's an interesting pattern. It will be a striking necklace once it's done. LM does some great patterns and you always learn something new doing one of her projects, which I really like - especially when it gives you ideas for your own creations!

So after that I have a few projects which are boiling away in my brain at the moment:
  • Another major crystal piece - blue this time - it's going to be major bling.
  • A couple of ideas with beaded cabochons - I really need to actually use some of the cabs I have stashed away!
  • I bought some fantastic glass beads from Spacetrader recently - made in the style of antique African beads, and I have a concept fizzing away at the moment - just need to work out the technicalities and the beads.
  • Plus I am determined to finish some of the UFOs littering my beading space. I did really well in 2009, got several UFOs finished to give away as Christmas presents, so the aim is to get a few more done.

I plan to use this blog to document my beading achievements, discuss lessons learned and thoughts about future pieces. It's a discipline thing ...

Last year's major project

This was my major project for 2009. It was made to enter into the 2009 Bead Society of Victoria's Bead Challenge Competition. The Bead Challenge is run every year. All entrants are given an identical set of beads to work with. You can make anything you want with them, and add as many other beads and other materials as you like, but you must use all of the beads in the Challenge set and they must be visible in the finished work.
It's a real challenge! This was actually the first time I managed to complete the challenge - two years in a row I bought the beads but never found any inspiration to make something with them.

I was really happy with the way this turned out, although I have to say it was a major learning experience and the next one will be very different. What did I learn in particular?
  • Don't squish your beads too tightly when you're doing bead embroidery. I found that in some places the work was distorted because I was trying too hard to avoid gaps. It would have been better to go back and fill in spaces with smaller beads.
  • Don't glue anything down until you are 100% certain it's staying. In future I will use double-sided tape for cabochons. On the flip side, I did learn that you can remove a glued cab from stiffened felt with a razor blade if you are very, very careful!
  • If you are beading a symmetrical piece, don't do most of one side before starting the other, do them together. I found that a couple of my cabs had ended up slightly off-measurement, which makes a difference when you're trying to do identical numbers of rows of beading. If I had realised earlier I would have been able to adjust the number of rows of beading more easily to compensate.
  • Take the advice in the books and make a pattern before you start. This collar doesn't sit quite right because I assumed that a perfect circle would be okay around the neck, but it isn't. I should have left a few centimeters gap at the back, which would have enabled the collar to sit flatter on the neck.
  • The fringe on this collar works really well with the double-layered effect, but I didn't allow enough time to finish it before it had to be handed in for the competition. One of these days I'd like to add more to the fringe - my original plan was to extend it around at least as far as the first crystals.

My next challenges coming out of this are to experiment more with the way I placed the crystals, using cut-outs and supports to make them sit out from the main beadwork, and to plan and execute another bead-embroidered collar. Whether I'll manage a collar this year is anybody's guess, there's so many other projects waiting to happen, but another crystal one is definitely on the way.

BTW I didn't win or even place in the competition.

The central cabochon in this piece is one I bought from Gary Wilson at the Bead and Button Show in Milwaukee in 2008. It's a really lovely piece of crazy lace agate. The Swarovski rivolis are all 'Purple Haze' colour. Apart from the Challenge beads the rest of the materials are:

  • Various seed beads, including cylinder beads, size 6, 8, 11 and 15o seed beads, triangle beads and so on.
  • The fringe is edged with Czech glass daggers and leaves and includes some Czech glass crystals.
  • The rivolis are edged with crystal briolette beads which are used to make the rivolis stand out from the surrounding beadwork.

http://www.beadsociety.com.au/

Aiming for a slightly Goth Effect

I made this necklace for Gin G. for Christmas 2009. It's based on a bead lace pattern in the book Crystal Lace Necklace Patterns by Sandra Halpenny. I followed the pattern until a certain point and then began lengthening the spikes, until I had made enough for a trangular effect. I used larger sizes of faceted glass crystals for the longer spikes to achieve a focal effect. The materials in this necklace are matt black size 11o seed beads, 4mm dark red facetted Czech crystals and larger glass crystals rounds. The fastener is a toggle and button loop with one of the larger crystals as the button.
I was aiming for a slightly Goth effect with this necklace. I'm going to have another attempt at some stage, just because it's fun to do something that aims to be ornate - plus I love black.